
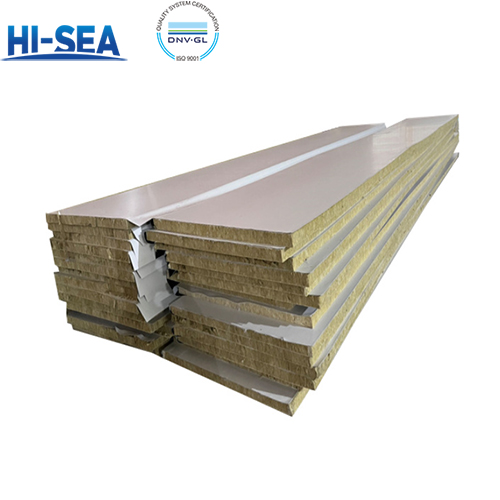
Rock Wool Sandwich Board
Rock wool sandwich board is a type of building material that consists of two outer layers of metal or other material with a layer of rock wool insulation in between. Rock wool is a type of mineral wool that is made from volcanic rock and other natural materials.
Overview
The rock wool insulation in the sandwich board provides excellent thermal and acoustic insulation properties, making it ideal for use in buildings where temperature control and soundproofing are important. The metal outer layers provide strength and durability, making the sandwich board a long-lasting and low-maintenance option for construction projects.
Installation Process of Rock Wool Sandwich Board
Phase 1: Pre-Construction Preparation
This is the foundation for ensuring a smooth project. The "preparation" section on the original webpage is overly vague.
Technical Clarification and Drawing Confirmation: The construction team must clarify installation details, joint treatments, and quality requirements with the design team and the client.
Material Delivery and Inspection:
Panels: Verify specifications, thickness, and quantity. Inspect the surface coating and core material for integrity, and check quality certifications such as fire resistance ratings.
Auxiliary Materials: Prepare compatible fasteners (self-tapping screws, anchors), sealants (weather-resistant caulking), connectors, etc.
Site and Tool Preparation: Ensure the work surface (steel structure or base layer) is completed and approved. Prepare tools such as cutting machines, electric drills, lifting equipment, and measuring instruments.
Phase 2: Main Frame Installation
This serves as the "skeleton" of the installation and determines the final flatness of the wall surface.
Layout and Positioning: Based on the drawings, establish reference lines and control lines on the ground and walls to determine the positions of studs or purlins.
Installation of the Main Structure: Install vertical studs or horizontal purlins, ensuring their spacing aligns with the panel dimensions.
Inspection and Leveling: Use tools like straightedges and levels to check the flatness and verticality of the entire frame, and make necessary adjustments.
Phase 3: Panel Installation
This is the core operational stage, requiring precise execution.
Positioning of the Starting Panel: Begin installation from the reference line, ensuring accurate placement. Typically, installation starts from a corner or door/window opening.
Sequential Installation and Fixing:
Position the panels and secure them to the frame using professional fasteners applied from the panel surface.
Ensure moderate fastening force to avoid over-tightening, which may deform the panel surface or crush the sealing strips, or under-tightening, which may result in loose connections.
Panels should be tightly butted against each other.
Joint and Opening Treatment: At door/window openings, corners, ridges, and other critical areas, follow the drawings for cutting, reinforcement, and special joint treatments.
Phase 4: Finishing and Inspection
This phase determines the final appearance and functionality.
Sealing with Caulking: Apply weather-resistant sealant to all panel joints and interfaces with other components (e.g., window frames, roofs) to ensure watertight and airtight performance.
Cleaning and Protection: Remove the protective film from the panels and clear any debris from the site.
Sub-project Acceptance Inspection: Conduct inspections according to relevant standards for flatness, verticality, joint quality, fastening stability, and overall appearance.
Picture of Rock Wool Sandwich Board